The Clone Stamp Tool will be used to "clone" or copy
an area of pixels and place them in another area.
Tool Box>Click Clone Stamp
Look at the Options Bar and use the drop down
arrow to click on the square brushes, if they are not
already selected. Put 30 in the Size box - "Normal" in
the Mode box and "100%" in the Opacity box. "Allign"
should be checked.
Now that the Clone Stamp has been clicked,
position it in the spot you see in the photo below:
(The square box next to Cathy's elbow is the spot)
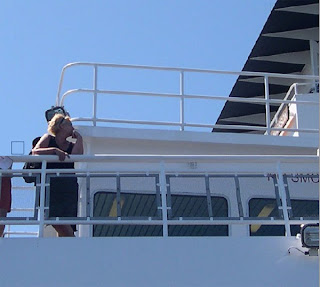
Press your Alt key with your left hand and look
to see that the cursor or square has changed to a
circle >leaving the Alt key depressed click the
mouse once and release the Alt key.
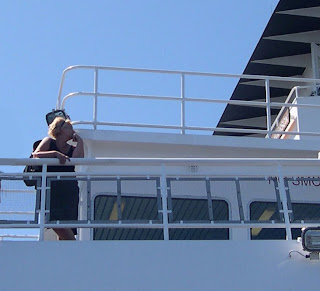
Now, move the sqaure to the left about
half an inch> Click and drag the mouse down slowly.
You will see a "+" appear to the right of the square.
The "+" shows you the area you are cloning. The area
you are dragging down will look like the area that the
+ is moving over. For example, below I picked up
the railing area with the blue sky behind it and
deposited it in the space where the lady's leg was.
You can see where my clone stamp overlapped below.
The purpose of this exercise, for me, is to see how the
composition looks with the lady removed.
So, I don't spend time making this a perfect picture.
an area of pixels and place them in another area.
Tool Box>Click Clone Stamp
Look at the Options Bar and use the drop down
arrow to click on the square brushes, if they are not
already selected. Put 30 in the Size box - "Normal" in
the Mode box and "100%" in the Opacity box. "Allign"
should be checked.
Now that the Clone Stamp has been clicked,
position it in the spot you see in the photo below:
(The square box next to Cathy's elbow is the spot)

Press your Alt key with your left hand and look
to see that the cursor or square has changed to a
circle >leaving the Alt key depressed click the
mouse once and release the Alt key.
Now, move the sqaure to the left about
half an inch> Click and drag the mouse down slowly.
You will see a "+" appear to the right of the square.
The "+" shows you the area you are cloning. The area
you are dragging down will look like the area that the
+ is moving over. For example, below I picked up
the railing area with the blue sky behind it and
deposited it in the space where the lady's leg was.
You can see where my clone stamp overlapped below.
The purpose of this exercise, for me, is to see how the
composition looks with the lady removed.
So, I don't spend time making this a perfect picture.

I like the choices I've made to simplify the
subject matter and I like the way the darks
form an interesting composition.

In the next post we will use "Threshold" to examine
the values and determine if this image has what it takes to
be a good painting.
the values and determine if this image has what it takes to
be a good painting.
Comments
xoxo
www.awonderingstar.com