We are continuing the lesson review of the
Basic Photoshop for Artists started on the
Oct. 3rd post, yesterday.
Menu Bar>File>Open>Photos 1>Look for "Cathy
on the Ferry" and Click on it. Look for "Cathy on
the Ferry" in "File Name" box>Click Open.

To tilt the photo to the right:
Basic Photoshop for Artists started on the
Oct. 3rd post, yesterday.
Menu Bar>File>Open>Photos 1>Look for "Cathy
on the Ferry" and Click on it. Look for "Cathy on
the Ferry" in "File Name" box>Click Open.

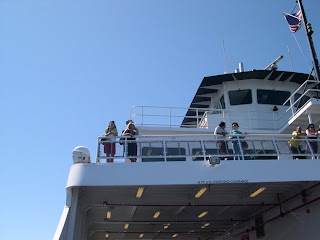
I used my zoom tool to explore different compositions
that appealed to me in this photo. My friend
Cathy (blonde hair in black dress towards the
left) had an interesting pose.The geometrical shapes
that surround her would be a nice contrast to a figure.
The horizontal line that the railing provides under
her elbow is at an upward angle. Adjusting it
to an angle that will be on a true horizon line, rather than
an upward angle is next.How to use a grid or ruler line
to help allign the railing is shown in the photo below
Menu Bar>View>Click on Grid

To tilt the photo to the right:
Menu Bar>Image>Rotate>Custom>Enter "1" in
white box>Click Right for the direction.
Click Okay. Below the screen shows that the photo
has been tilted to the right. I removed the check from
grid when I captured the screen image below. So,
no grids show below:

By clicking Tool Box> Zoom toolThen Options Bar>"Fit Screen" you will see that
the rotate command was successful.
Next we will crop to find a possible composition:
Tool Box>Click Crop tool> Place cursor in the space
above Cathy and the person on our left. Move up
to near the height of the dark ferry roof>Click and dragin a diagonal direction and release the mouse
button. Use the anchors on the side of the crop
lines to move them and when you are pleased with
the crop >Click on the Check next to the X

In the next post we will use the Eye Dropper Tool
and Polygonal Lasso Tool.
and Polygonal Lasso Tool.
Comments